
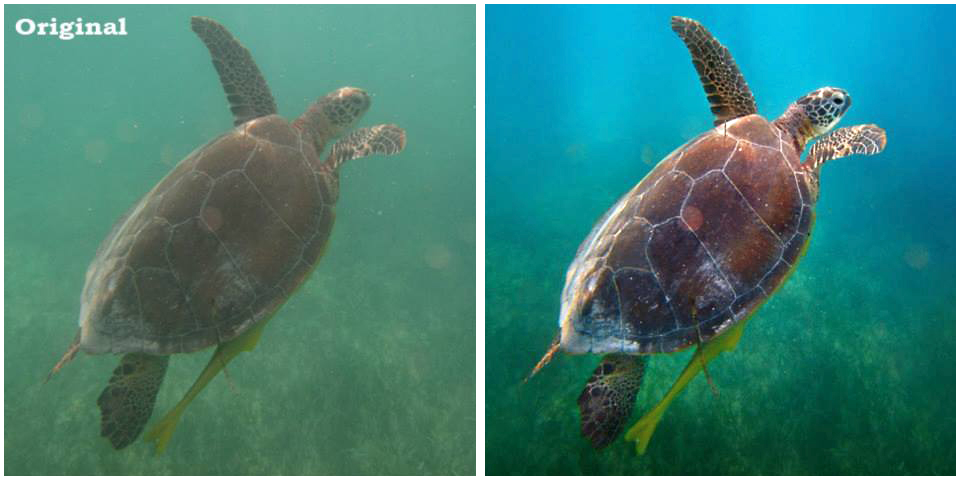
 Underwater Colour Correction - It's an Art! By Jill Smith If you are taking pictures underwater, then you already know that no matter how great the shot is, it is going to need some work post-processing. It is an unfortunate truth that light does not travel through water as it does through air, so we have to deal with a severe loss of colour as the red (followed by orange and then yellow), gets filtered out inch by inch. The more water between you and your subject, the more the colour gets filtered out. First of all, don't use Photoshop as an excuse to get sloppy with photography. Getting the best shot possible from the point of click, not only makes the post-processing easier, but the final result will be so much better! How many divers are using Adobe Photoshop to colour correct their underwater photography? If not Photoshop or Lightroom, what do you use? Feel free to add comments below and share your experiences with us! If there is interest, I will keep posting some of the tips and techniques that work for me, and for anyone who wants to contribute, we can share your tips and successes too! Do It In the RAW No joke. My whole camera choice was based on the priority of my needs. Priority number 1: I want to shoot in RAW. Why?
Priority number 2: I wanted to find a compact, mirrorless camera that had all the capabilities of a DSLR. So, I decided to purchase the Sony A6000 mirrorless camera (already obsolete), and a Nauticam housing (new November 2016: 2.8 16mm wide angle lens with a dome port for my housing!). Using Camera Raw One method of underwater colour correction enhancement I use frequently is to open the RAW image in Camera Raw and make adjustments for the water, and ignore the subject matter entirely. Once the image exposed for water is open in Photoshop, I then re-open the RAW image in Camera Raw, and this time I make adjustments for the subject. Both versions are opened in Photoshop. This is purely subjective. I love the deep blue of the water, and I want to keep that. In the image below, (opened in Camera Raw) I can see I am having a problem with the vignette shadows in the corners. I was aware of this problem when I got my Nauticam Housing for the Sony A6000, and simply forgot to tweak the zoom in a little bit to avoid that. That can be corrected or cropped out at the end. 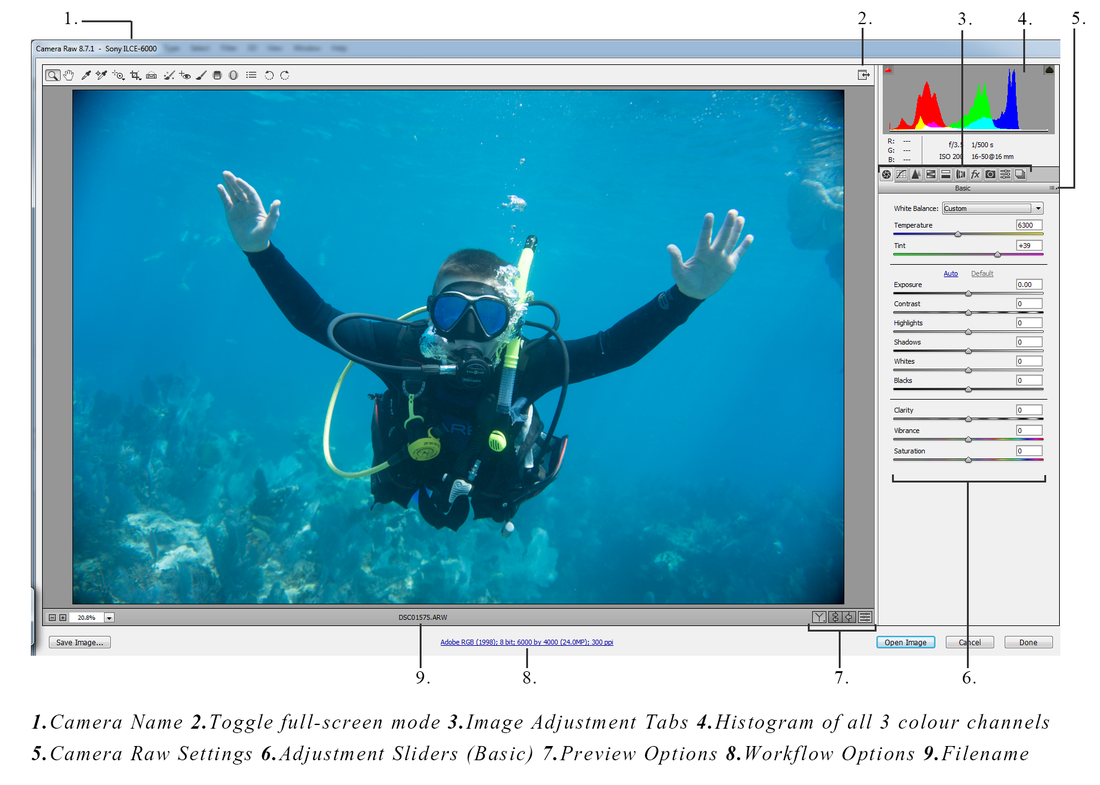 Above is a map of the Camera Raw dialogue box (basic). Under the adjustment tabs there are sliders for making basic adjustments to the image: Temperature and Tint - these are for adjusting white balance. I use these a lot for underwater images Exposure - there is a little wiggle room here if the exposure is off. Exposure can be increased or decreased by up to 5 stops. Contrast - Slide the contrast up or down Highlights - may be nominally useful if you have strong highlights you wish to tone down. Shadows - open up the shadows in an image they are too dark Whites - adjusts white clipping (clip whites more or less) Blacks - adjusts black clipping (clip blacks more or less) Clarity - creates a super-contrast effect on mid-tones (similar to a large radius sharpen) Vibrance - a kind of smart saturation tool; vibrance increases saturation of low saturated colours, but has less effect on colours already high in saturation. Saturation - increases saturation of all colours equally 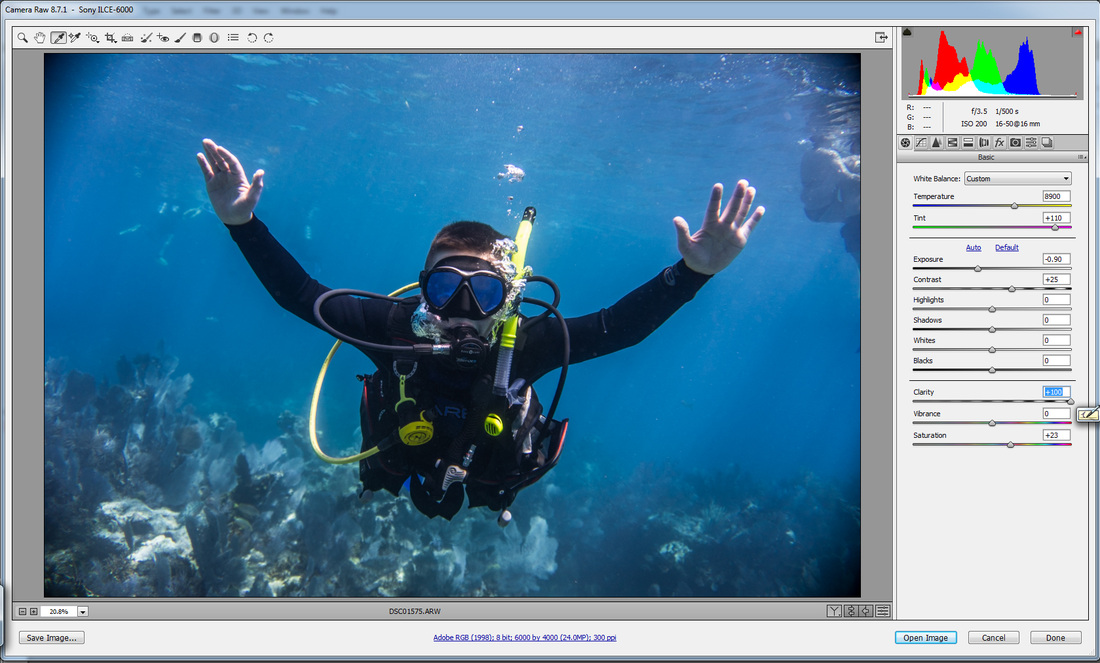 Adjusted for the Blue Water: lowered exposure, increased contrast, increased clarity, and bumped up saturation. 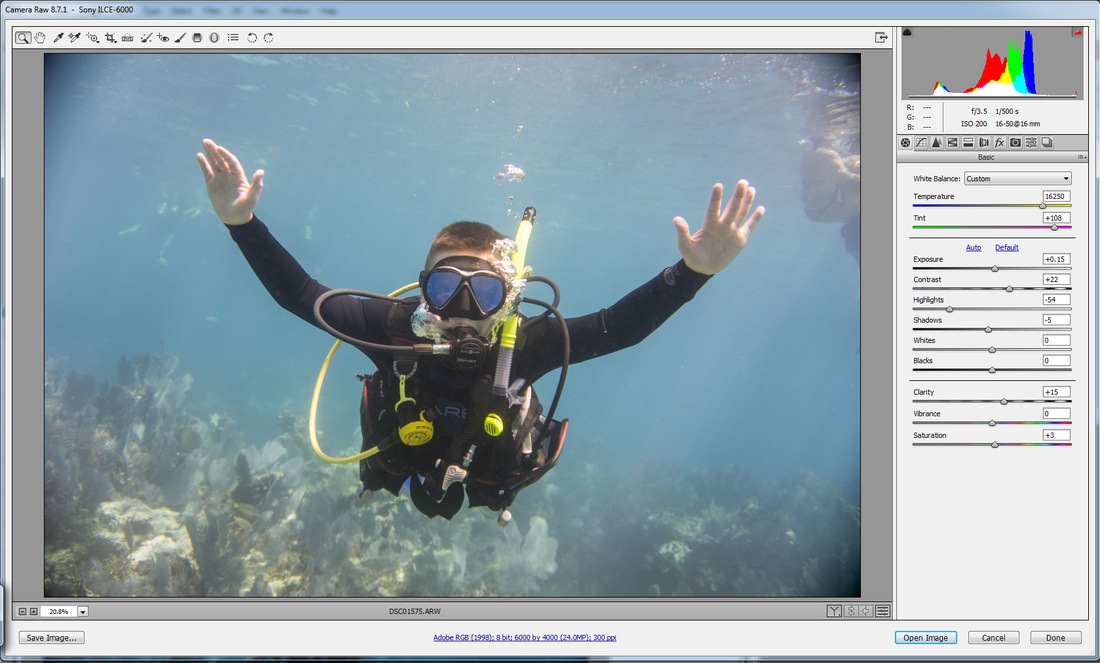 Adjusted for the Diver: White balance adjusted to make wetsuit neutral, increased exposure, increased contrast  White Balance Tool White Balance Tool For those of you who like the second image and would not wish to do anything further, I used the white balance tool in Camera Raw to make the wetsuit neutral. You can find that in the top menu bar beside the hand tool. Click the dropper and then click an area in the image that you KNOW to be black or gray neutral; I used a part of my son's arm. I chose an area that was neither in shadow nor highlighted, just a good representation of the wetsuit. Most of what you see there is a result of the white balance tool. I may have tweaked a few settings here and there, but not much. When you are satisfied with your adjustments, click "Open Image" (bottom right area of the dialogue box). Now there are two images open on the Adobe Photoshop desktop.  Move Tool Move Tool Select the move tool from the tool bar on the left side of the desktop. While holding the SHIFT key down, click on the image adjusted for the subject, and drag over to the image adjusted for the background. Let go of the mouse before you release the shift key. If done correctly, you will have both images stacked together in one document, perfectly aligned (holding down the shift key while dragging the image over places it in the perfect centre). Confirm this by checking your layers palette on the left side of the desktop. With the layers tab highlighted (at the top of the palette), you should see two layers stacked underneath. You will only see the top layer in the image window. To ensure that they are aligned properly, turn the eyeball icon on and off of the top layer to show the layer underneath (eyeball icon is to the left of the thumbnail of the top layer in the Layers palette). If they are perfectly aligned, then we are ready to start working on our layer mask.  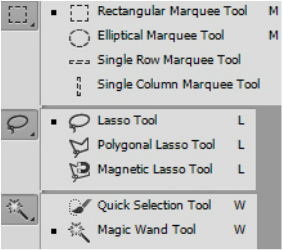 Selection Tools from the Tool bar Selection Tools from the Tool bar Make a Selection Make a selection of everything but the subject, and mask out the background of the top layer - allowing the background of the bottom layer to show through. There are a few selection tools to choose from. Under the Move tool on the tool bar, there are 3 options for selections: Rectangular Marquee, Lasso, and Magic Wand. Further to that, there is a tiny triangle in the bottom left corner of each of those icons, meaning that there are more tool options underneath. Click and hold the icon to reveal the mini-menu. I chose the Quick Selection tool, found under the Magic Wand. Click and drag to add pixels of similar colour and tonal value to the selection. The selection will show like a row of marching ants around your edges. If it adds too much, hold the alt key down (notice the little minus icon inside your cursor) and click and drag the tonal values you wish to subtract from the selection.  Brush Tool Brush Tool Create a Layer mask Once the selection is done, go to the bottom of the Layers Palette and click the "add a mask" icon (or go to Menu > Layer > Layer Mask > Reveal Selection). The "add a mask icon is to the right of the fx icon and looks like a circle within a rectangle. Make sure your top layer is selected when you do so. Now we have a layer mask applied to the top layer based on our selection. The thumbnail to the right of the image thumbnail shows us what is masked in black to allow the underneath layer to show through. While the Quick Selection Tool does a great job in areas where the edge contrast is very pronounced, there may be some areas that need "tweaking". We can simply use the paintbrush tool to brush the black in areas we wish to mask, and white in areas we wish to unmask. To edit the mask, select it in the Layers Palette (you will see the highlight box surrounding it), and select your brush from the tool bar. Your foreground colours should be black and white, but to make sure they aren't any shade of gray, reset them by hitting the letter "D" on the keyboard. You will be painting on the mask with the foreground colour. If you wish to change from black to white (or back again), hit the "X" key on your keyboard. Other Keyboard Shortcuts to help Edit Mask: Increase or Decrease Brush Size: Square Brackets (beside P) Zoom in: Hold the Spacebar and the Ctrl key as you click inside the image Zoom out: Hold the Spacebar and the Alt key as you click inside the image Navigating within a zoomed image: Hold Spacebar down and the hand tool will appear. Click and drag while continuing to hold the Spacebar down to navigate within a zoomed image. 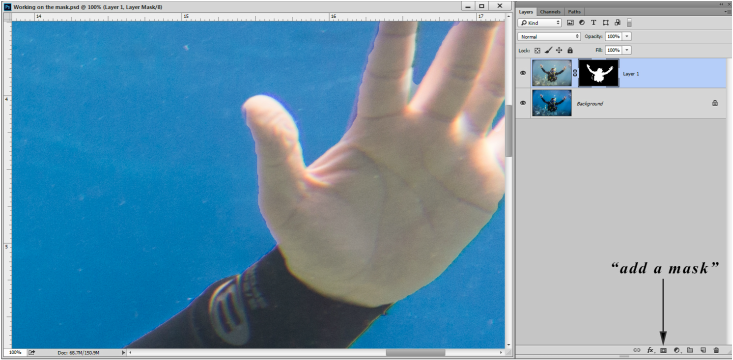 You can make any adjustments you wish to either layer and they will remain separate. Done! Flatten Image (Menu > Layer > Flatten Image).  Happy Editing!
1 Comment
 Yep, I'm packing! Yep, I'm packing! Bahamas here I come! By Jill As I prepare for our upcoming Bahamas trip aboard the beautiful Aqua Cat Liveaboard, I turn my mind towards underwater photography and what it will take to get those beautiful shots. Those of you who know me, know that I do not have a lot of dives under my belt (yet), but now that Jody is making a significant investment in my camera and housing, that is going to have to change. I worry about my courage in this; will I be too faint of heart to carefully approach a moray eel so that I get low, get close, and get the shot? Probably. Maybe. I don't rightly know. Time will tell, won’t it? In the meantime, I am asking questions and researching, trying to arm myself with knowledge, as that may be the thing to make me bolder. I shied away from a great shot of a moray eel having its teeth cleaned by cleaner shrimp in Mexico last year. I stayed well back and took that crappy long distance shot that barely shows a subject at all. Our friend Dean of The Dive Academy called me a “chicken” when I told him that (not unkindly, hahaha). So here is a compilation of advice given by various divers experienced in photography, websites I have found to be helpful, and the knowledge I already have of photography above the waves on solid ground. I share this with those of you who, like me, are interested in taking your underwater photography skills to the next level. The Checklist 1. Are your batteries for all strobes and the camera fully charged and ready to go? 2. Make sure that your O-rings are clean and free of debris, and seated properly in place. 3. Is your SD in the camera and ready to go? This one is for me, I've been caught with my pants down on this more than once, and it's annoying. 4. Don't attempt your giant stride entry with your camera in hand. Have someone hand it to you after you have safely entered the water and checked your gear. 5. Have your camera system attached to you via a lanyard to your BCD. You never know when you will need both hands free for a task. Be Ready Be familiar with your camera equipment so that you can make adjustments fast, eyes closed, and with one arm tied behind your back. Well, maybe all that isn't necessary, but you should be very comfortable with changing settings on land so that it is easy for you during a dive. 1. Do you know how to change program modes on the fly quickly and easily? Manual to aperture priority and then to video mode? Practice before you dive. 2. Does your flash allow you to adjust power output? Is there a diffuser that you can utilize during a dive? Make sure you can make these adjustments as the need arises below the waves. Buoyancy I will struggle with this, because I still need to take the PADI Peak Buoyancy course with Jody. Fortunately, he lets me practice in the pool; ask him - he's pretty nice - you can practice too. 1. Silt is your enemy - Mastering your buoyancy skills results in less silt and sand being stirred up by… YOU! Photographing any subject in silty water can be akin to taking pictures in a snowstorm, and that’s just ugly. Learning to “frog-kick” when swimming along the bottom can go a long way to avoid stirring up a cloud of particles; it’s sort of like the breast stroke, and it may take some practice. 2. Steady as she goes – I am used to using tripods and photographing still subjects; underwater is a whole different experience. I’m moving, the water containing particles between my camera and my subject is moving, and if I’m photographing marine life, then there is a good chance that my subject is moving too! We already face the challenge of photography in low light filtered by the water, so the better you are at steadying yourself in the water (perhaps even supporting yourself with a non-living object in the water such as a rock), the better your chances of getting a good, clean shot - absent of “camera shake” (more on that later). Awareness I have certainly found it easy to become so engrossed in capturing that shot of the menacing looking barracuda (from a safe distance because I am a chicken), that I lost track of some important things: 1. The fragile marine environment. Pay attention to what is underneath you; a careless fin kick can destroy sensitive reef animals, and just breaking off a couple of inches of precious coral could take more than our lifetime to grow back. It is never worth getting the shot if we are damaging the marine eco-system that we love so much. 2. Check your air, then check your air, and then check your air again! You will be surprised how fast it disappears – time flies when you are having fun (or breathing heavily because you are getting an amazing shot of that moray eel coming at you with its jaws wide open)! Composition This is going to be hard to do. We have all kinds of things going on down there: we are trying to control our buoyancy, watch our depth and air, control the camera, and now we have to worry about composition too? We may just consider ourselves lucky enough to capture that octopus at all, never mind framing the image just right. I guess it will depend on our timing, cooperation of the animal, and…well a lot of luck for me. Here is a compilation of all the tips on composition I have found: 1. Get Low – getting below your subject or at least eye-level with it will create a more dynamic and engaging image. 2. Get Close – Hmmmm. Easier said than done. Like I already mentioned, I have issues with this one, but I am planning to work on it in the Bahamas this November. Pray I don’t get my face chewed off. Remember that the more water between your camera and subject, the more loss of colour (the light from your flash has to travel through the water to strike the subject, and then reflect back to the camera through the water again), and higher probability of distracting floating particles. This is one reason why wide angle lenses are so great for divers - you can close the distance between what you are photographing and still fit it in the frame! 3. Avoid too much negative space around your subject. Of course, getting close will help, but perhaps using the reef as part of your artful composition will pretty your picture up. That said, I do want to make sure I get a shot of any amazing creature I see. Getting artful with it will come second to that. 4. Try to have your subjects facing into the image, not swimming out of it. An image will hold a viewer’s attention longer if the fish is swimming into the photo, and not off the edge. Strobes We all know that water is a colour-killer. White light (sunlight) contains equal parts of all colours; as the light travels through water, however, the colours get filtered out, starting with red, then orange, then yellow, and so on. This is why the reef appears more colourful in shallow water, and the deeper you go, the more colour you lose. Everything starts to look green, brown, and blue at depth. A million shades of ugly if you are a photographer. Strobes are going to be necessary to “put that colour back in”! We can debate all day on cameras and their features, but strobes are going to be even more important than your camera. I will take a $99 camera with a strobe, over a $3000 camera without one any day (don’t tell Jody, because I’m really excited to have a small compact camera with RAW file format capture as well). Here are some of the recommendations I have heard on strobes: 1. Powerful, wide angle strobes! An angle of light spanning at least 100 degrees is ideal. You will want to illuminate any animal or scene that captures your interest, whether it is a little Christmas tree worm, or a large reef shark! 2. Get your strobes on long, bendable arms. Using the flash built into the camera is inevitably going to result in backscatter. Backscatter is the illumination of all the tiny particles in the water between your camera lens and your subject. Moving your strobes off to the side will avoid the “snowstorm” effect. 3. Dean suggested to me that I use a couple of powerful Sola lights (by Light & Motion) mounted on arms instead of strobes, so I may be taking that route when I put my kit together. I started writing about exposure here too, but once I got to 1000 words, and realized I still had so much more to say, I decided to take it out (for now), as this is just a wee blog, not a book. Perhaps another time.
So, until the Bahamas...HAPPY DIVING! |
 FlickrAlbumAuthorsJill Smith 
Coral Restoration
Archives
January 2024
Categories
All
 
|
 RSS Feed
Our Services |
Company |
SupportOur Blog
|
|
Copyright © 2014
|
Newmarket, ON
|
(905) 898 5338
|
info@adventuresports.ca
|