
|
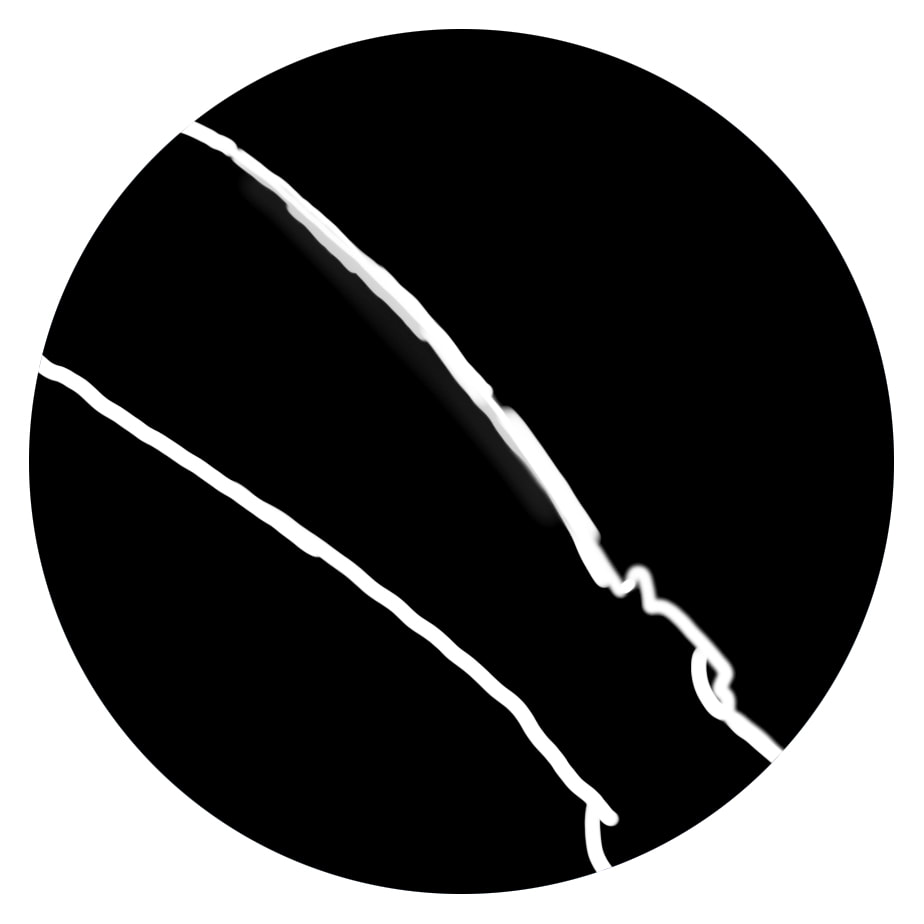
By Jill Smith 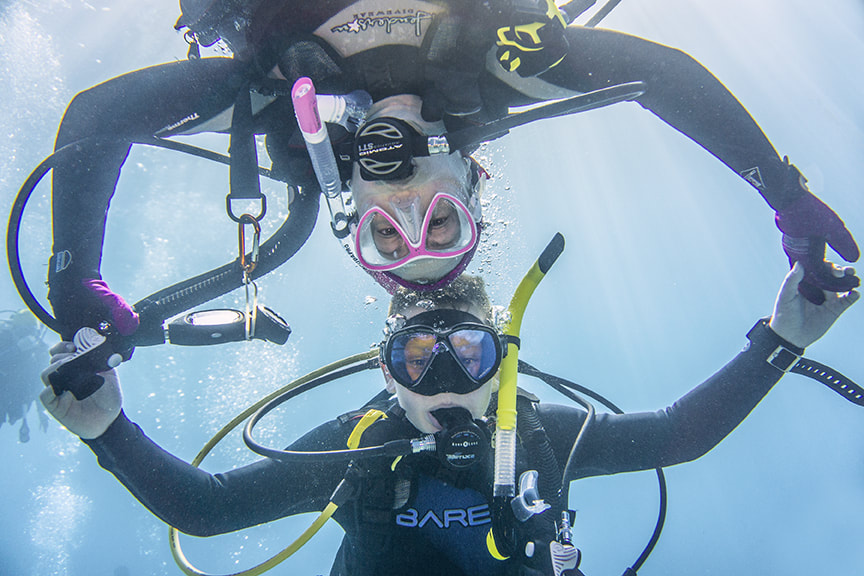 Notice the chromatic aberration along the arms. Chromatic Aberrations are those ugly, coloured halos that may outline contrasted edges in an image. They are often bright blues and yellows, or magentas and greens. The colours of light (yes, white light is made up of colours; all the colours of the rainbow - same principles apply), don't all behave and bend the same way. That is why we get to see and enjoy rainbows (nice), but also why we have these gross distortions (not so nice). Here are two quick and dirty ways to banish them (one way is quicker and dirtier than the other, but it may not always be the answer). Method 1 RAW images - If your images have been shot in RAW file format, they may be opened in Camera Raw, and possibly corrected very easily there. Go to the Lens Corrections tab, and click the “Remove Chromatic Aberration” box at the top of the panel. Most of the time this will do a good job. That was easy. 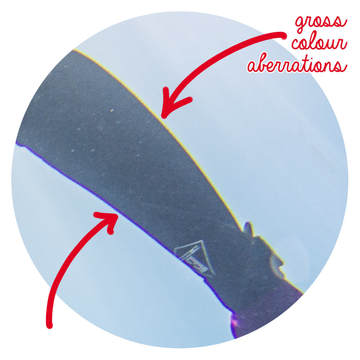 Method 2 The following Chromatic Aberration Removal technique may be employed in the event that the Camera Raw feature did not completely remove the aberration, or if there is no RAW image to work with. This image sports arguably the most grotesque chromatic aberration I have ever seen. Notice how the distortion becomes more severe further away from the centre of the image. The distortion here is so terrible for a couple of reasons:
The Steps
 This part of the process will be numbered to correspond with the figure below.
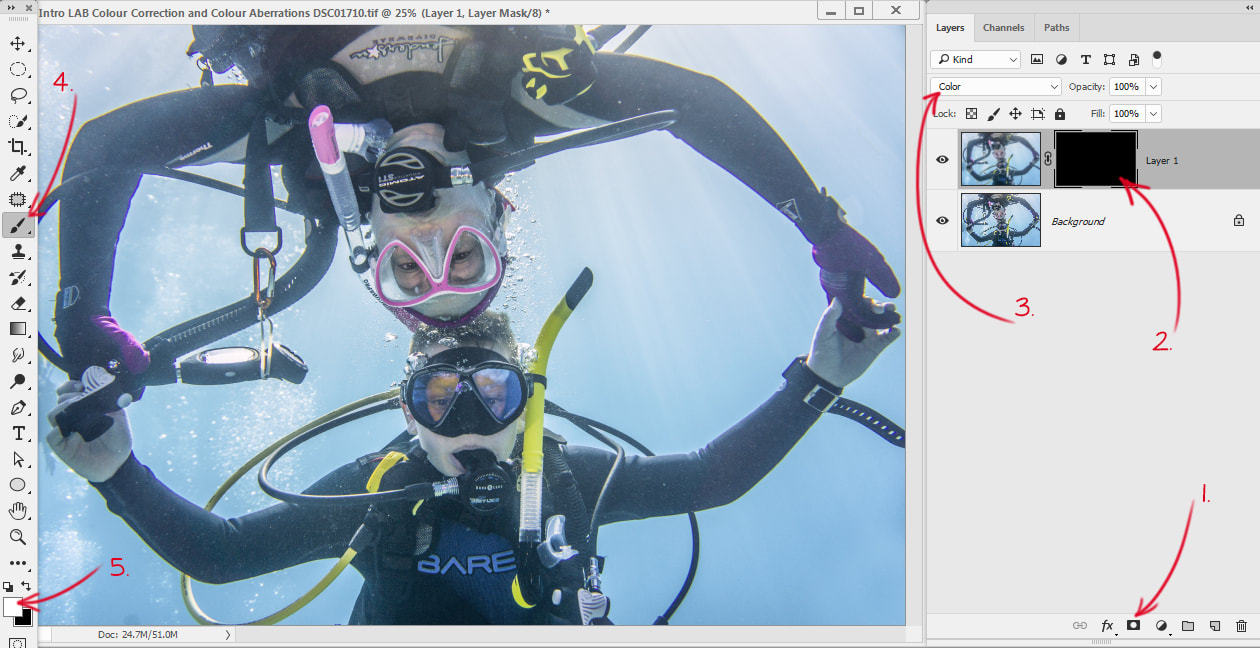
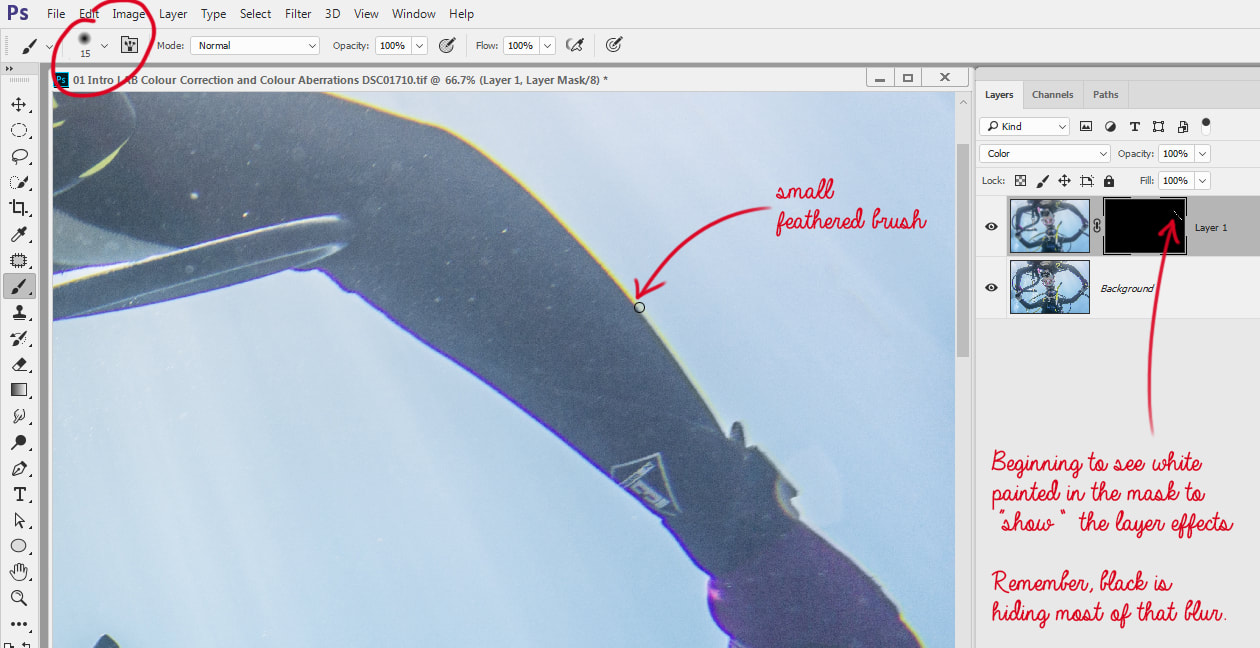 Brush Options are circled at the top. Now just carefully "paint away" all that ugly!
While the nasty colours have been taken care of, this particular image (and this section taken near the edge) was an extreme example, and I can still see the contrast on the edges. If I first ran this image through Camera Raw and checked the "Remove Chromatic Aberrations" box, they would have been largely removed, and the above method would have cleaned the rest up beautifully....but for this method, we wanted to work with the worst case scenario.
Happy Shooting and Editing!
0 Comments
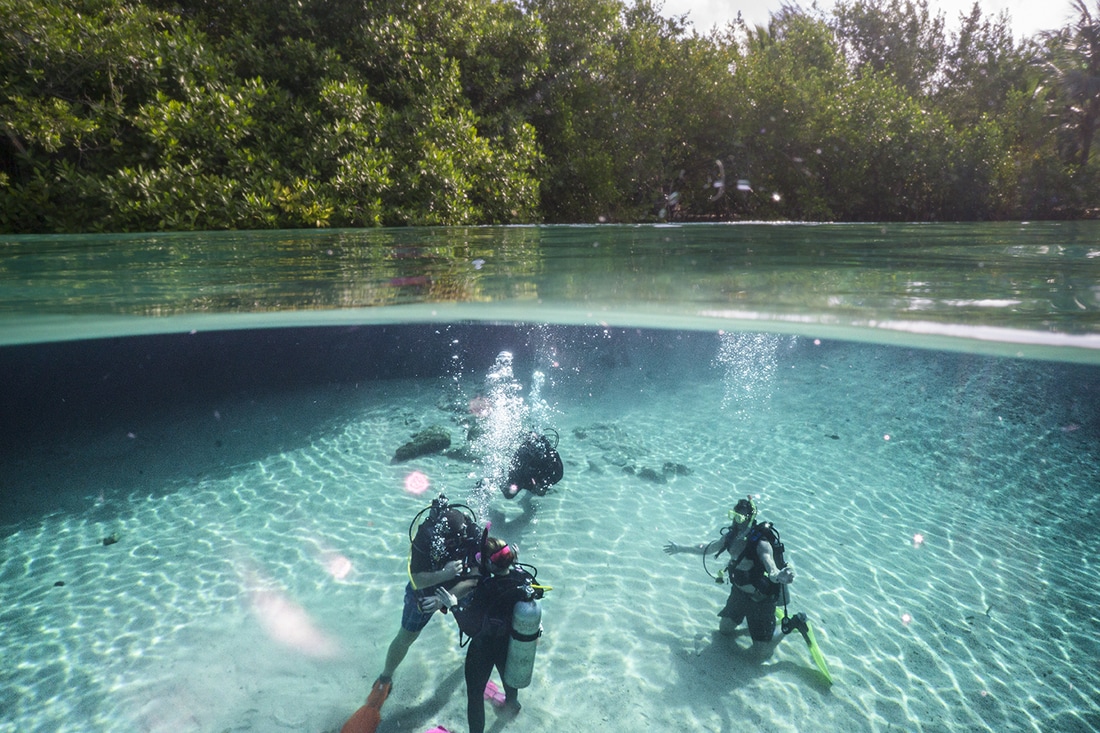
By Jill Smith  A beautiful whale shark suctioning the water to get some of that delicious plankton. 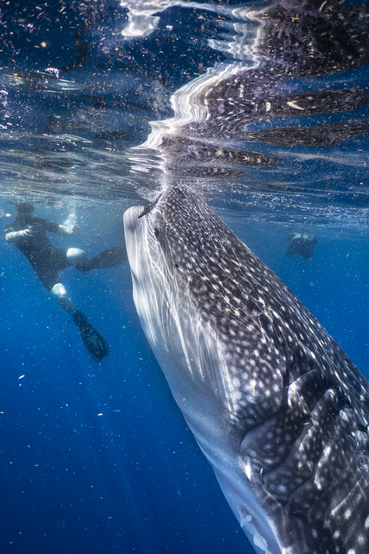 Rhincodon Typus (Whale Shark) Fresh from our Whale Shark trip... and it was awesome! Although these beautiful beasts may be found in tropical waters all over the world, they are not commonly experienced by divers and snorkelers. That makes our encounter with them extra special! Luckily for us, hundreds of these gentle giants congregate to feed around the Yucatan Peninsula and the Gulf of Mexico from June to August, so planning our encounters has been relatively easy. We have a good relationship with Solo Buceo Dive Shop* in Cancun, which helps to make it an amazing adventure! Whale sharks are filter feeders, and although they are the largest fish in the ocean, they feed on the tiniest creatures, barely visible to the human eye; they can grow up to 40 feet in length, so naturally, they have to eat almost continuously! These animals can live to be over 100 years old (if they are not hunted by humans). Females are larger than males. The more you learn about these fish, the more fascinating they are! Whale Shark Photography Traditional underwater photography rules still apply, such as holding the camera as steady as possible. If you are snorkeling, try holding your breath as you squeeze the shutter release, and of course, try to keep your shutter speed fast enough to freeze the action. The shark is moving, the water is moving, you are moving. If possible I want my shutter speed set to 1/125 or faster. Light In Mexico, you are permitted only to snorkel with whale sharks, and whale sharks glide across the top of the water, so your experience with them is shallow. And you know what shallow water means… more natural light! Strobes need not apply! Lens Whale sharks are enormous; they can be as big as a school bus, and that means you need to consider your lens. A wide angle lens and/or a dome port will help a great deal in terms of fitting these overgrown puppies into your frame. A wide angle lens and a dome port offer a couple of advantages:
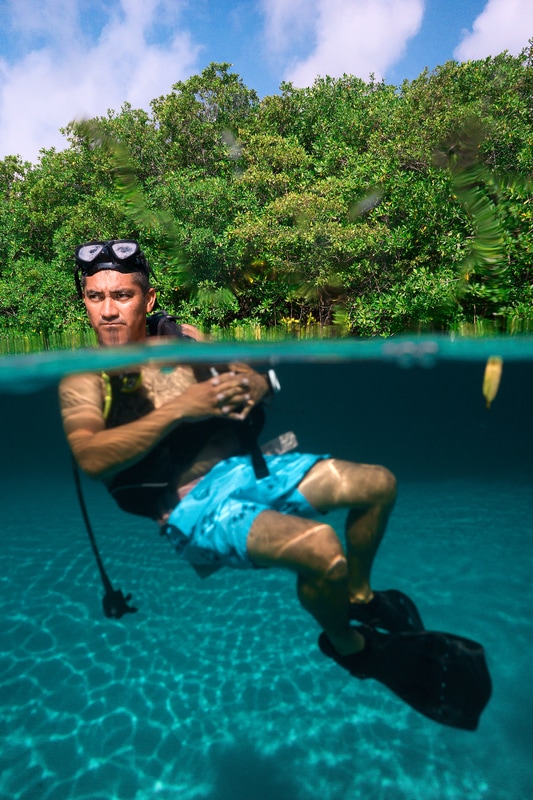
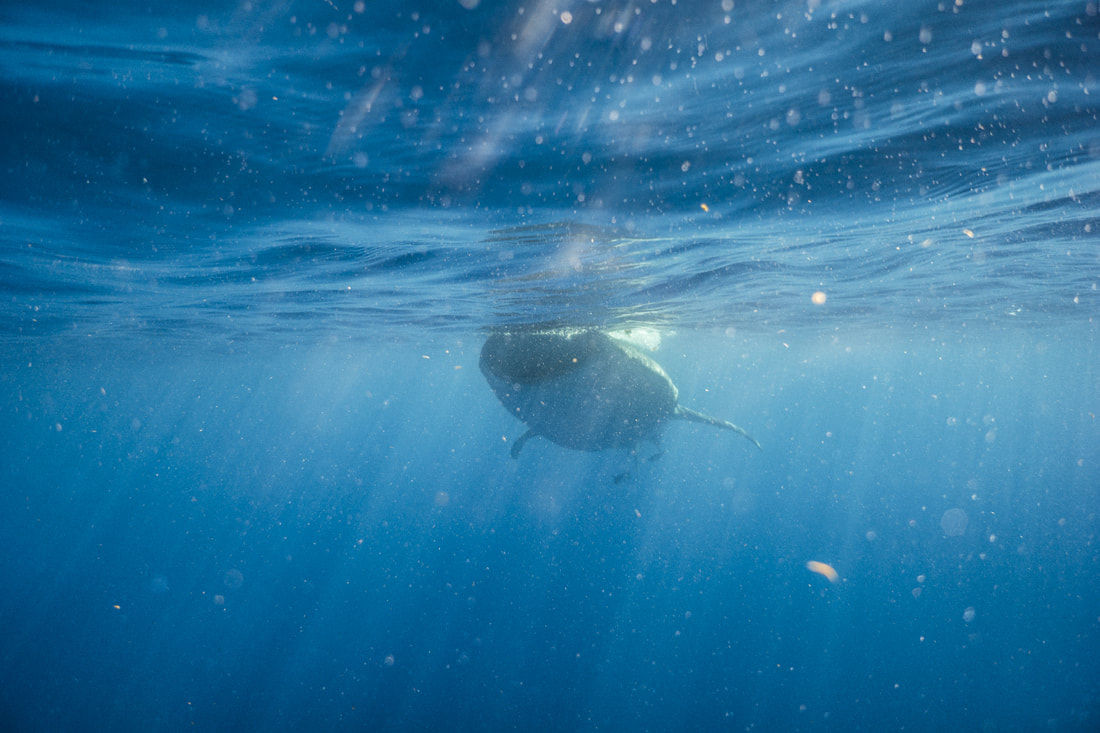 Thick, plankton soup! A lot of debris makes photography a challenge. 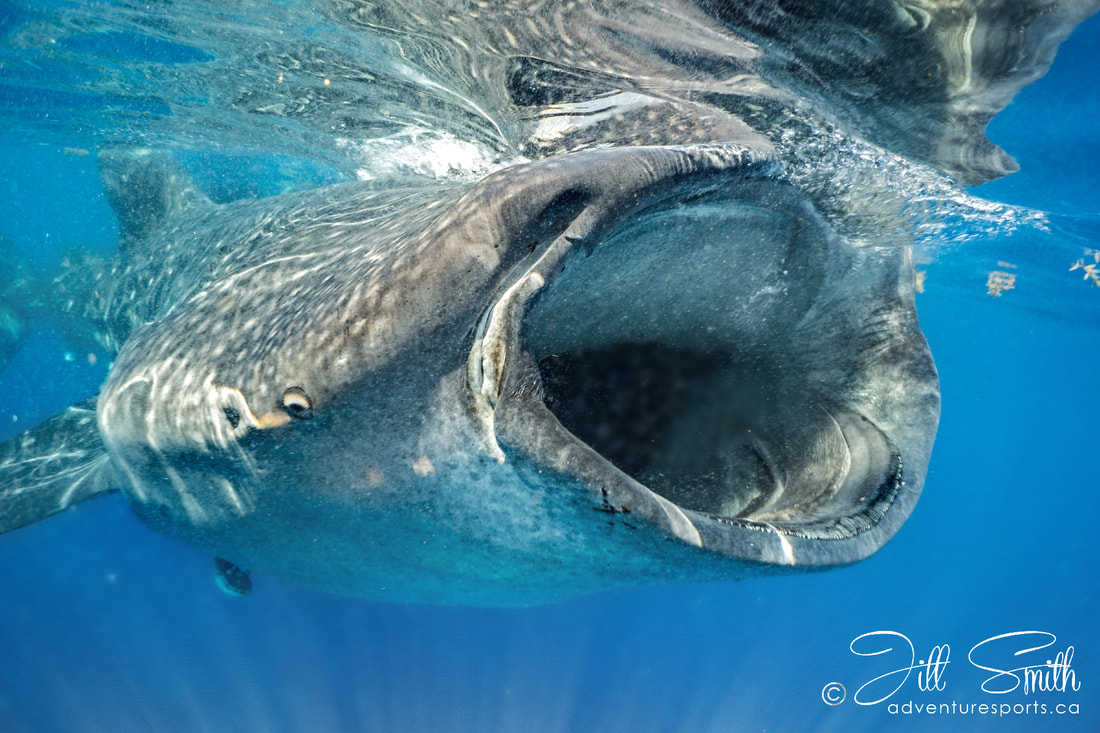 Even this close (I could easily reach out and touch her), with a 16mm wide angle and 4.33 " dome port, the small water debris is an issue. 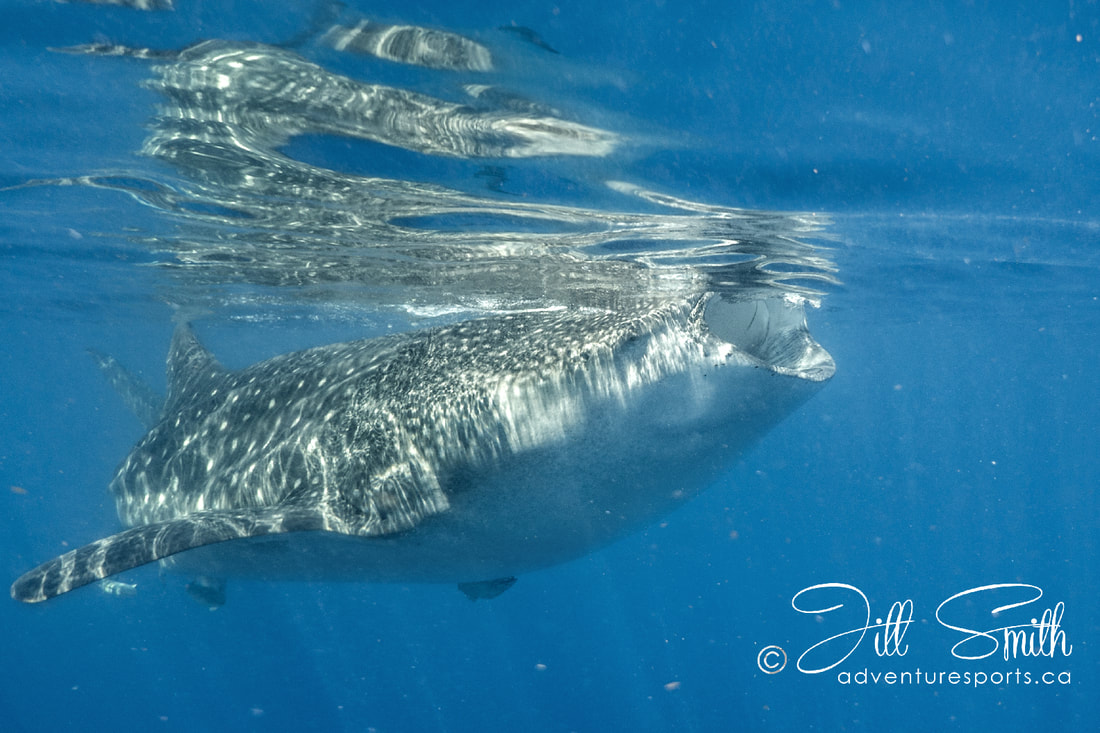 Is there anything more beautiful?  Lining up the shot Never try to out-swim a whale shark. They appear to be swimming slowly, but their fins are bigger than yours; you will exhaust yourself trying to keep up, and you won’t be able to hold the camera steady at the same time anyway. Try to anticipate the trajectory of the whale shark swimming in the water and intercept its path, or wait for a swim-by. You can see in the photo below, that Trena has floated patiently in the line of the shark’s path, and the shark came straight towards her – right in the mouth! What a great experience! Husband Rick watches in awe. We all found it to be an awesome experience! Composition If it is possible, shooting up at the animal often results in a more dramatic and pleasing shot. A little freediving practice won’t hurt! 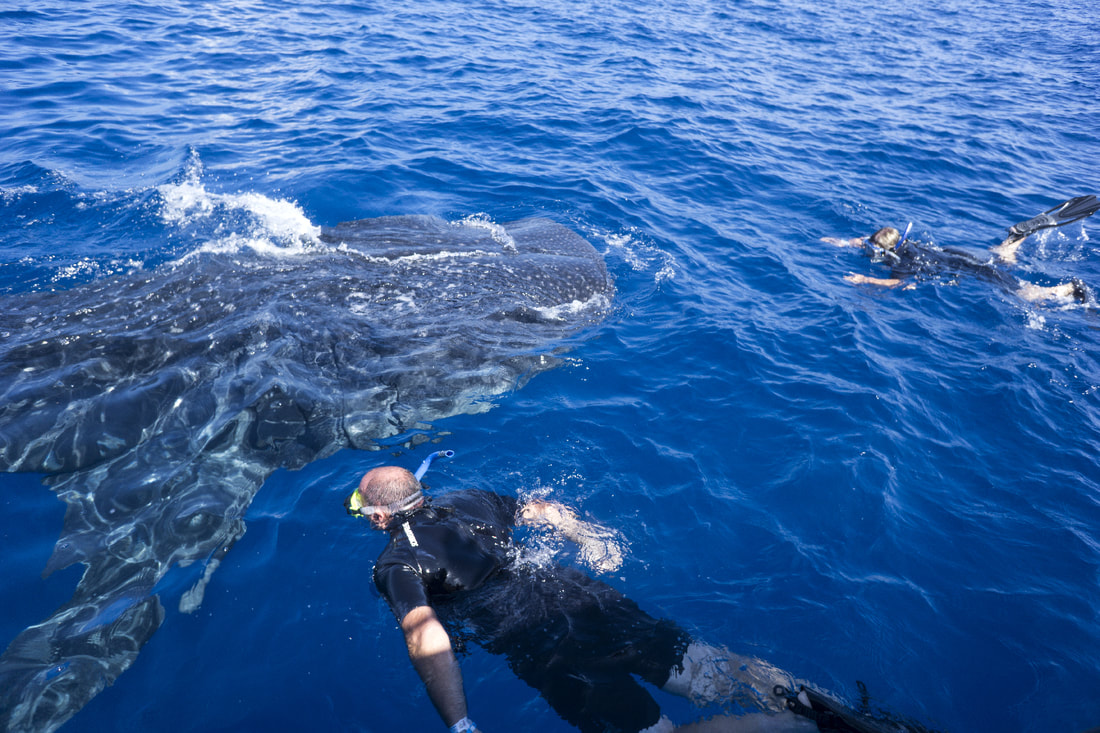 Trena and Rick face the gentle giant mouth to mouth Photography and Protecting these Darlings Did you know that whale sharks are listed as “endangered” on the International Union for Conservation of Nature’s (IUCN) Red List of Threatened Species? Your photography can actually contribute to the global effort to protect and learn about amazing whale sharks! Link to Red List of Threatened Species: http://www.iucnredlist.org/details/19488/0 How Can Your Photography Help? The patterns and scarring on whale sharks are as distinctive as a fingerprint, allowing scientists to identify individuals for long-term, mark-recapture analysis. If population models can be created to give conservation management authorities a better understanding of the habits and stressors on these animals, then well-informed plans may be developed to take action for their preservation. How do I Take Photos for Wildbook and Whale Shark Conservation?
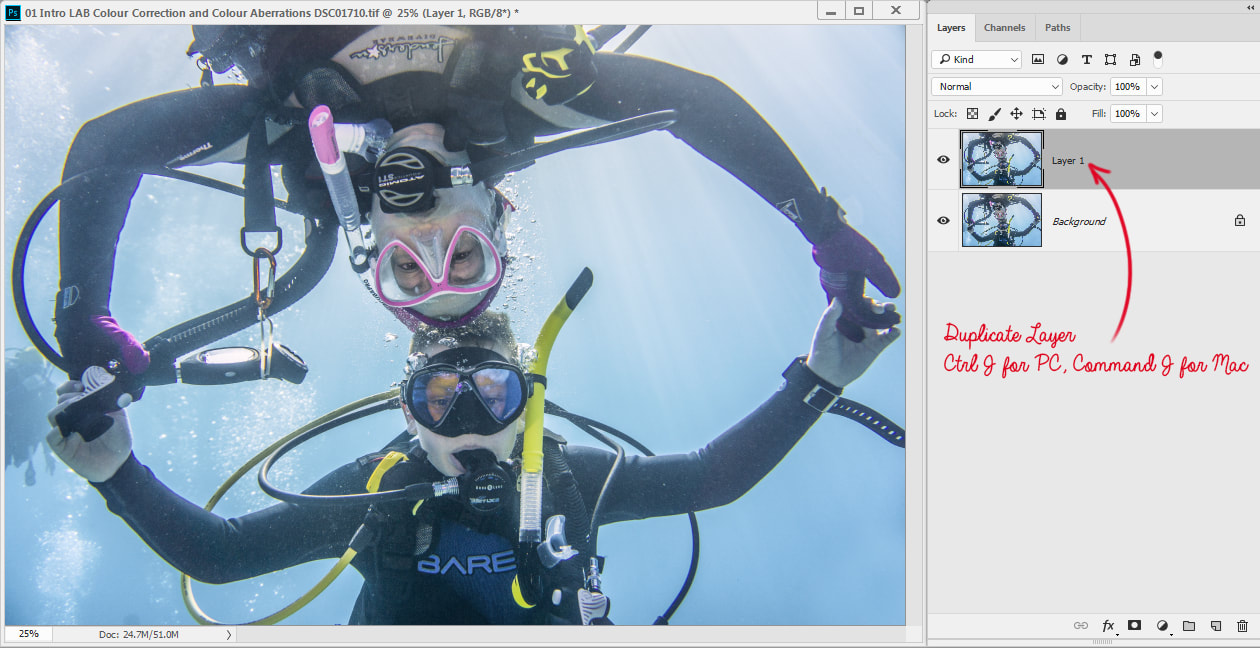
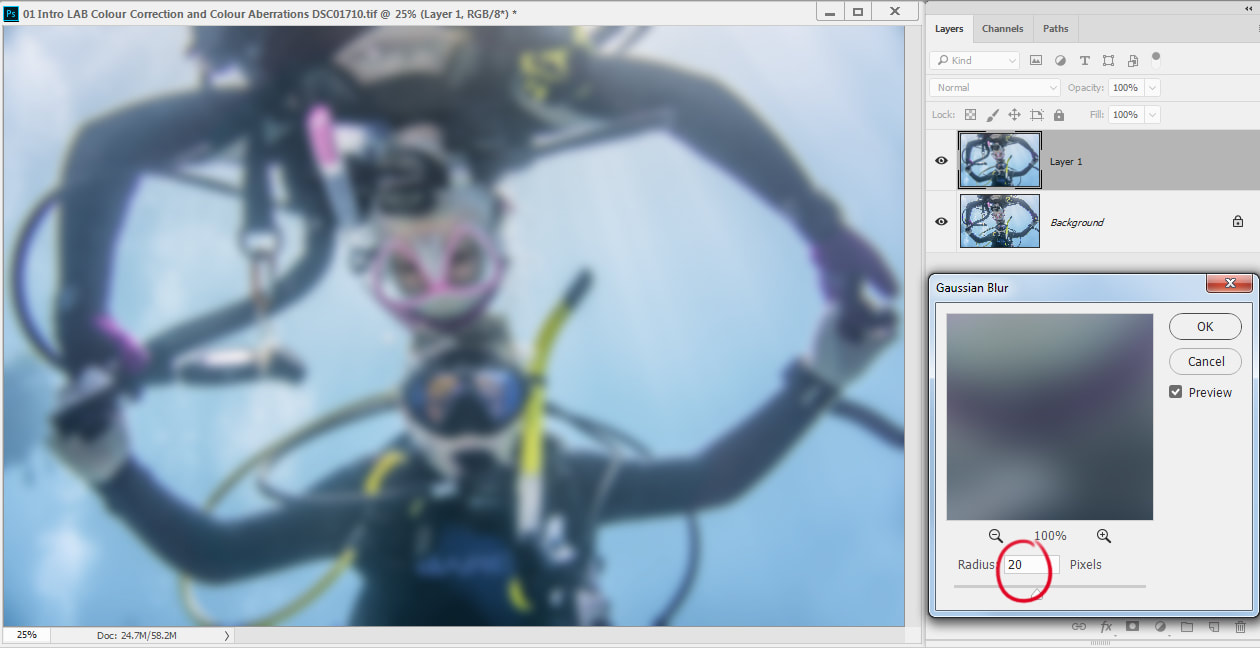
Submit Whale Shark Identifying Photos to: http://www.whaleshark.org/submit.jsp Thank you for contributing to this global effort to protect the whale sharks! 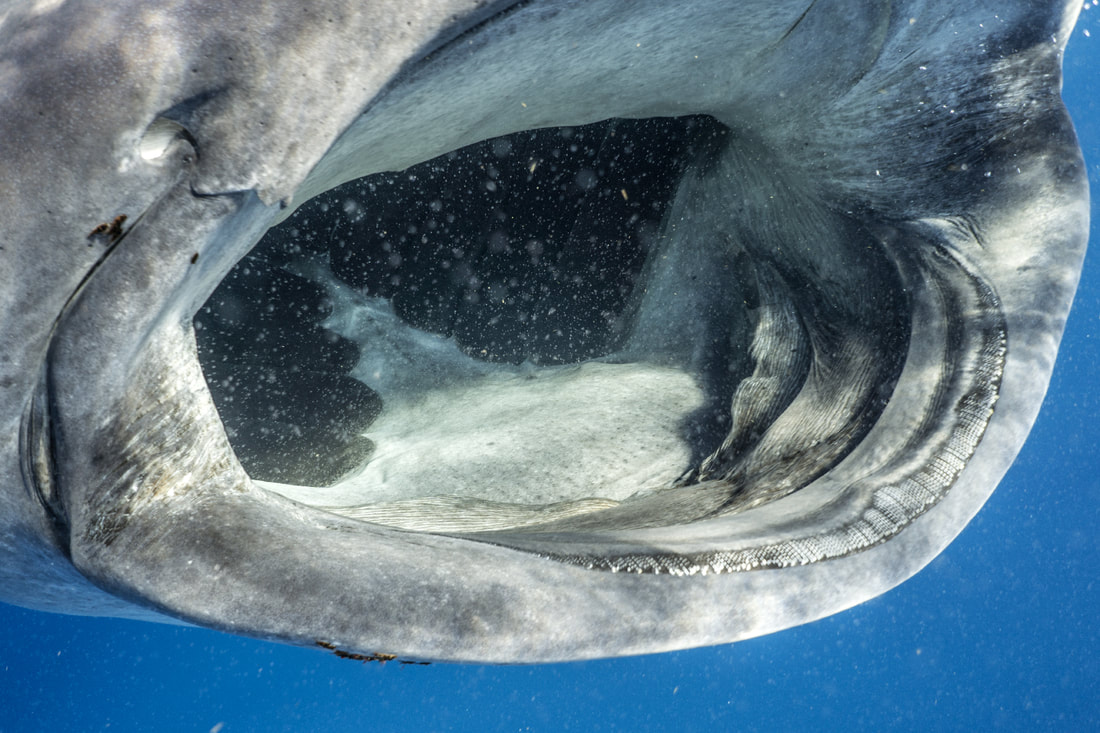 By Jill Smith - Whale shark mouth—Can you see the many rows of tiny teeth they have? * Solo Buceo Dive Shop (Cancun)– Have diving needs in the Cancun area? Visit Solo Buceo, and tell them Adventure Sports Newmarket (Jody) sent you! You won’t be sorry; their service and dive expertise will make you a very happy diver! Want us to make your diving arrangements for you? No problem! 905-898-5338 As with everything in photography, it’s all about the light. The dome port is essentially an additional optical element, much like the lens itself, and it will reduce problems such as refraction, radial distortion, and chromatic aberrations. 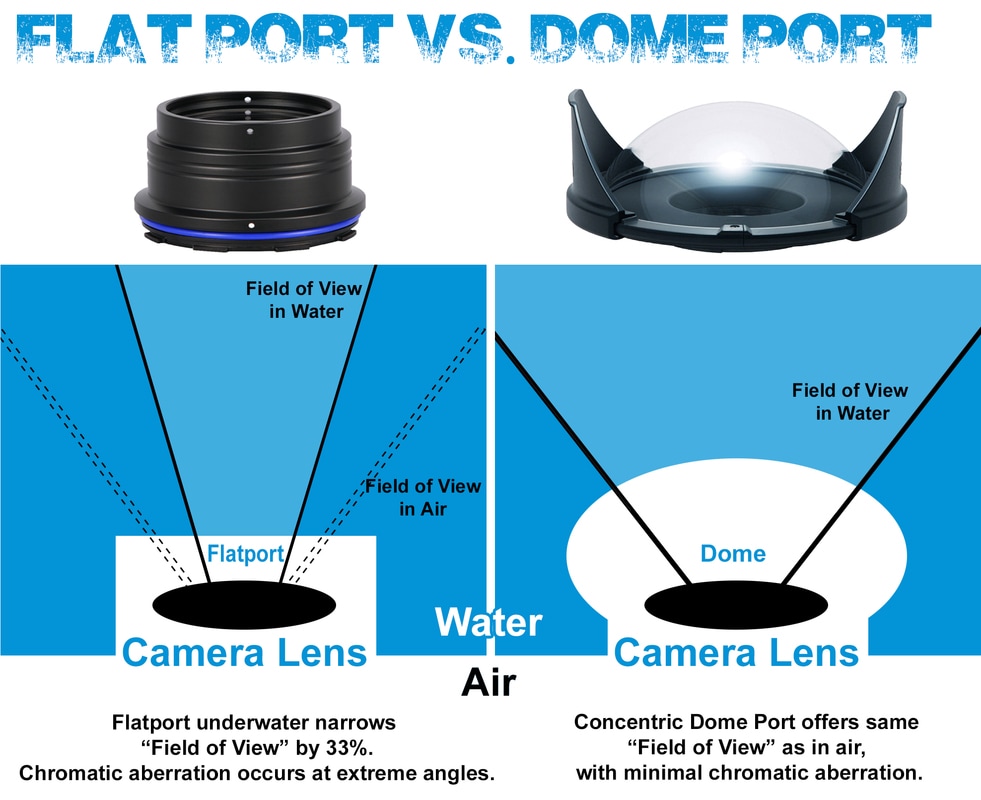 Refraction is the bending of light waves as they pass through the air inside the camera housing and the water outside the lens port. While light is refracted roughly 25 percent, the focal length of the lens increases by the same amount. You will remember that wearing your facemask under water is different than wearing it on land. Underwater, the laws of refraction cause objects to appear larger and closer - the same distortion occurs with a flat port lens. When a dome port is used, the rays of light pass through the curvature of the dome, avoiding refraction, and allowing the interior lens to retain its angle of view. Radial Distortion becomes more prevalent with wide angle lenses and large apertures when used with flat ports. The effect is a blur that progresses from the sharpest point in the centre of the frame to the outer edge. The dome port significantly reduces this distortion effect because we have already reduced the problems of refraction. 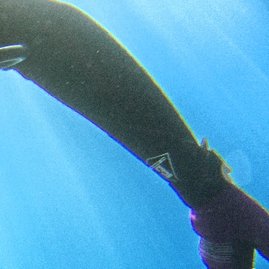 Chromatic Aberration Chromatic Aberration Chromatic Aberrations are happily avoided when using a dome port, since it is the refraction of light that causes white light to be separated into the different wave lengths of the colour spectrum. Colours within the spectrum do not travel at the same speed, so as light rays travel from water, through glass, to air, they will be unequally bent, causing the different colours to overlap – particularly noticeable on the edges within the image. Dome Ports Underwater are Different When using a dome port underwater, the “virtual image” must be focused on, not the “actual subject” itself. The virtual image is created inches in front of the lens with the dome port. This is why the virtual image must be focused on for under/over shots, while using a small aperture (high f-stop) to create enough depth of field to capture the “above the waves” image at the same time. Under/Overs 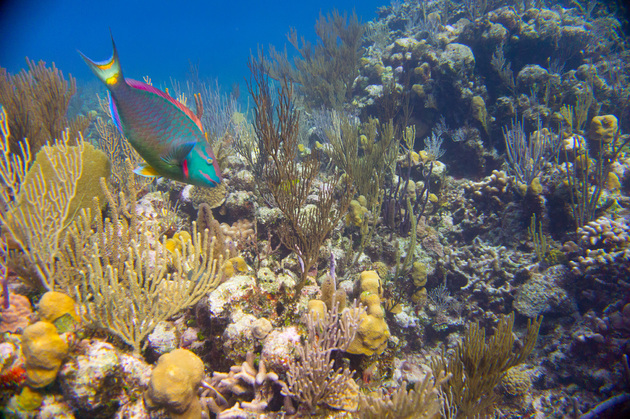 Image of a Stoplight parrotfish to be sharpened. If you are an underwater photographer, you know that even your best work will need to undergo some image editing to make it the best it can be. In Photoshop we have some powerhouse sharpening options at our disposal, but I often find these image improvement tools to be a double-edged sword. Excessively glowing highlight halos and colour aberrations make a mess of any sharpen job, unless you know how to hold these undesirables at bay. Unsharp mask can be found under the menu > filter > Unsharp mask. The name comes from an old darkroom technique of making inverted, unsharp negatives of the original, sandwiching them with a glass plate, and re-exposing to reveal a sharp edge. In Adobe Photoshop®, the "Unsharp Mask" tool looks for edges in an image. Within the dark side of an edge, a dark halo is created, and within the light side of the edge, a light halo is created, boosting the contrast of the detail. There are three settings to consider: Amount - The higher the percentage, the stronger the effect. Radius - The range of pixels on either side of the determined edge that will be affected. Threshold - The level of difference in tonal values between pixels before they are considered to be edge pixels. Keep this value low, roughly between 0 and 5.  How Unsharp Mask works. A contrasting halo defines the edges found within the image. Colour halos are highly saturated. There are two general methods of sharpening with this tool: High Amount (around 500%), Low Radius (1-2 pixels) – Good for sharpening tiny detail in an image. If there is any noise present, this setting may increase chatter to an unpleasant degree (read: that pesky backscatter). Keep threshold between 0-5 levels of difference for edge finding. Incidentally, if you are sharpening images of faces above the water, this method is usually undesirable. It will sharpen every line and pore in the skin of your subject, and personally, while I have earned every wrinkle on my face and do not need to have them removed, I certainly do NOT wish to have them enhanced! Lower Amount (30 – 150%), High Radius (5 – 30 pixels) – To find just the right radius, set the Amount to 500% temporarily. Slowly move your radius slider up until you see clear definition of the detail in the main subject of the image. Reduce Amount to desired level. There are two problems when using Unsharp mask in RGB colour mode in Photoshop. The first is that you will find some very nasty colour aberration effects along the edges in your image. This is a result of the sharpening algorithm and the way it functions; as you can see in the image above, there are halos created along the edges, and the colours of those halos are usually very intense, deeply saturated colours. The second problem is the introduction of bright white halos, particularly around fine detail such as fan-coral, which tend to be distracting to our eyes. There are many techniques to solve both of these problems. Here is one of them. Open Image to be sharpened: 1. Duplicate the layer in the Layers Palette (Ctrl J). There is now a locked Background layer, and Layer 1 (Background Copy), which is active because it is highlighted blue. *The layers palette can be found on the right side of your desktop. Activate the Layers tab so you can see the layers listed there. 2. From the menu bar across the top of the program, go to Filter > Sharpen > Unsharp mask. The little window shows a zoomed portion of the image. In the figure below, you can see the colour aberrations present due to the sharpen settings chosen. Click anywhere in the image to see that section in the zoom window. When you click and hold your mouse inside the window, you will see the "before" version, and when you release the mouse, you will see the "after sharpen effects applied" version. Set your amount to 500% while you visually choose a radius that defines the edges nicely in your image; then bring the amount back down. 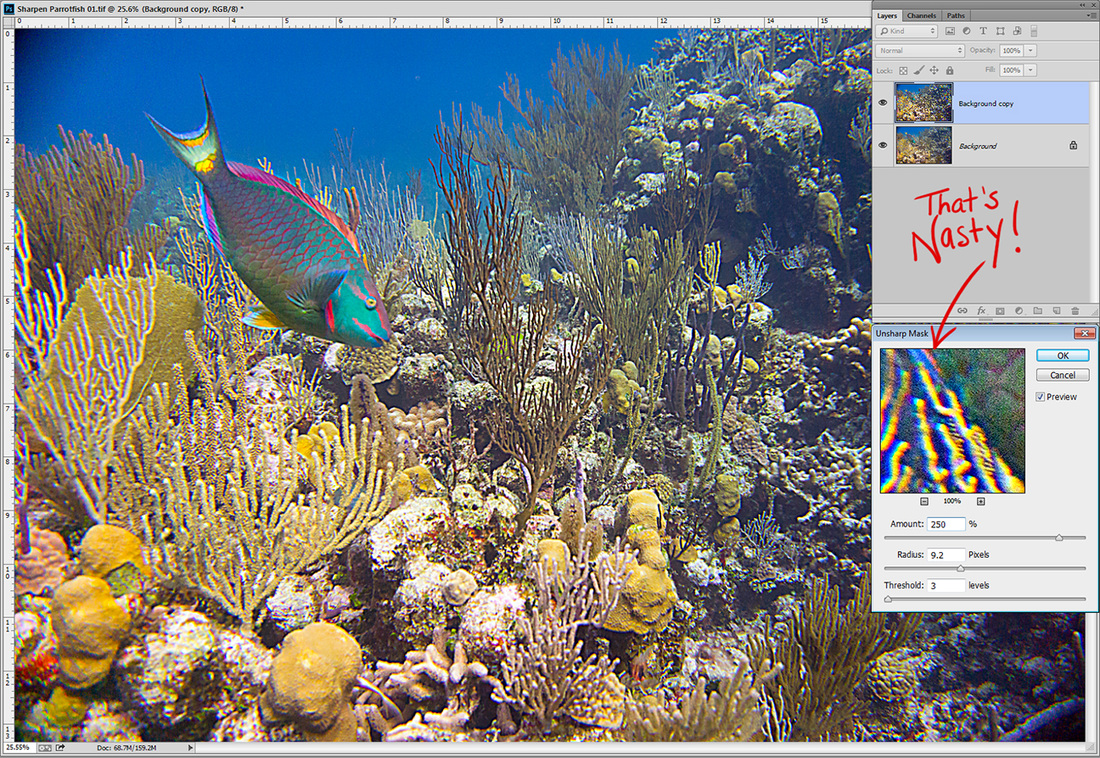 An extreme setting is easier to see here - notice the ugly chromatic aberrations happening in the zoom window. 3. Under the Layers tab, there is a blending option. It defaults to Normal - click that box to reveal a dropdown menu, and very near the bottom, choose luminosity. This is instructing the program to use the luminosity (detail) of the top layer, but use the colour from the bottom layer to blend these layers together. This will eliminate the colour aberrations created by the unsharp mask.  Blending the luminosity of the top layer (detail) with the bottom layer (colour). 4. Now to reduce the exaggerated white halos while keeping the dark halos and edge contrast. While the top layer is still active, go to Image > Apply Image (top menu bar). Source 1 is your active image. Layer needs to be changed from Merged, to the Background layer (the unsharpened version, which is absent of white halos). Channel may remain at RGB. Blending mode should be changed to Darken. This will tell Photoshop to blend your background layer with your sharpened version by comparing each pixel between the two, and using whichever pixel is darker. This will eliminate the white halos entirely when the Opacity is at 100%, but reducing that to 50% will allow the halos to show through at half strength. 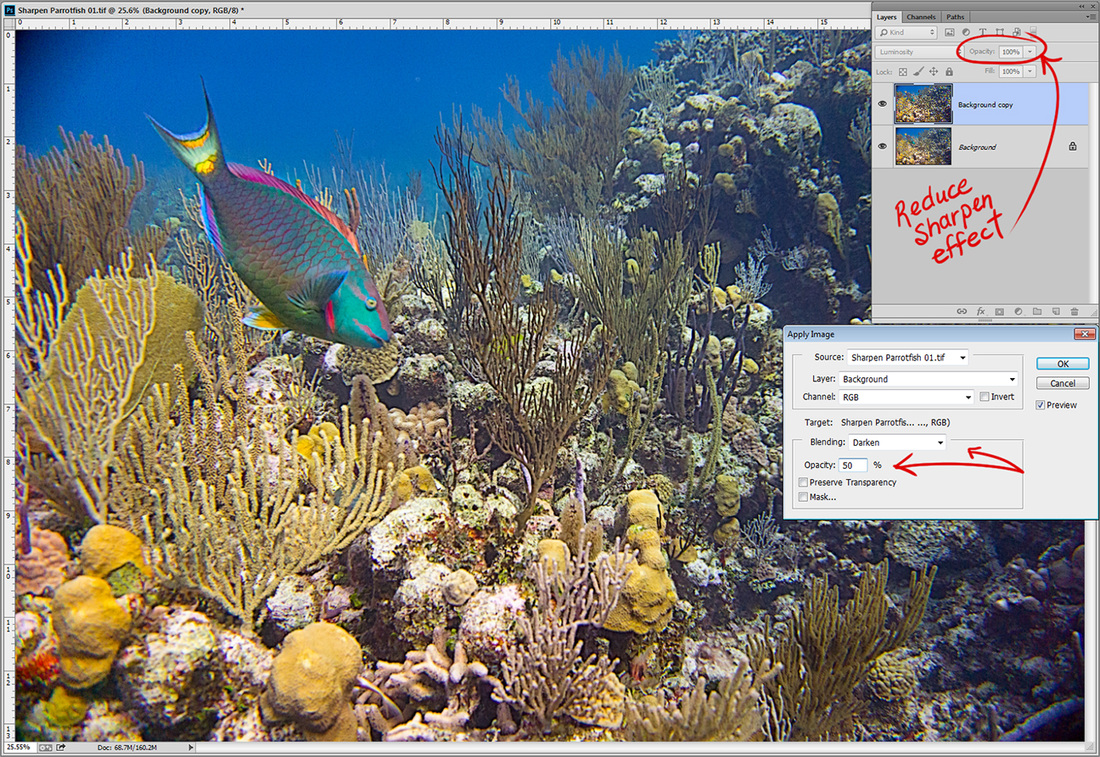 Image > Apply Image - Background layer applied to the sharpen layer in Darken mode at 50% to mute the halos. 5. Now that the colour aberrations and white halos have been taken care of, you may determine if you want to keep this sharpening effect at full strength, or if you think you may have been heavy handed, you may reduce the opacity of the top layer. Opacity is to the right of the Layer blend option in the Layers Palette near the top. 6. Tip: The nature of human sight is such that we can only focus on one area at a time. While our sight is focussed on one area in our vision, our peripheral vision is out of focus and somewhat de-saturated (colourless). Sometimes I will make a conscious effort to replicate that effect in an image (although I am partial to very colourful images, so it is not too often) in order to make the subject stand out brighter, sharper, and more colourful than everything else. I will create a layer mask after my sharpening has been applied, and mask out the sharpening effects on the foreground and/or background, keeping the subject in sharpest focus. To do so, click the “add a mask” icon at the bottom of the Layer’s palette while holding the Alt key down (see figure below). This adds a black mask over your sharpened layer, which hides all of the work you have just done. That’s ok, because now you can “paint in” the sharpening effects where you want them. Choose the paintbrush from the tool bar (shown below), set your brush size and hardness (set hardness to 0 so that your brush is soft and feathers the effect in) in the Options bar. You will need to paint in the mask with white to “show” the sharpening effects of your work in those areas. Set the brush colour to white by hitting the “D” key on the keyboard, making the foreground swatch black, and the background swatch white (shown below at the bottom of the tool bar), and then hit the “X” key to switch them. Your brush is now white. Make sure the mask is active rather than the image itself, by clicking in the middle of the black mask icon on the layer bar. 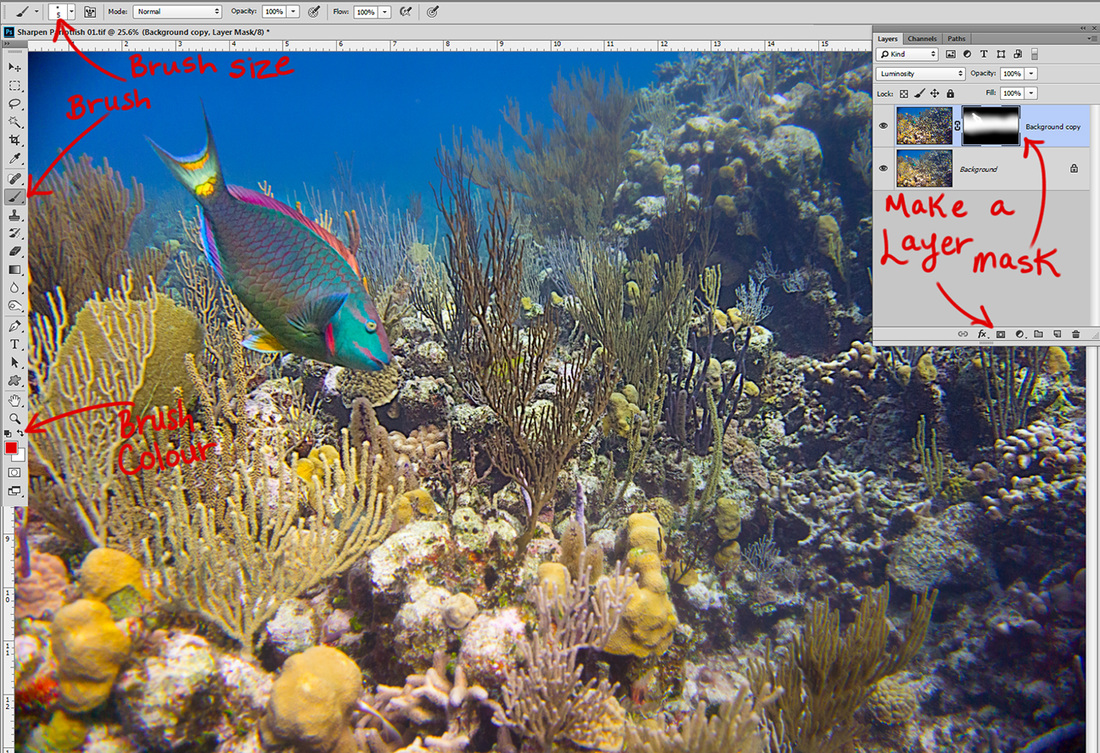 When you are done, click the drop down arrow on the right side of the layers palette, and choose Flatten. Save.  Before Sharpen 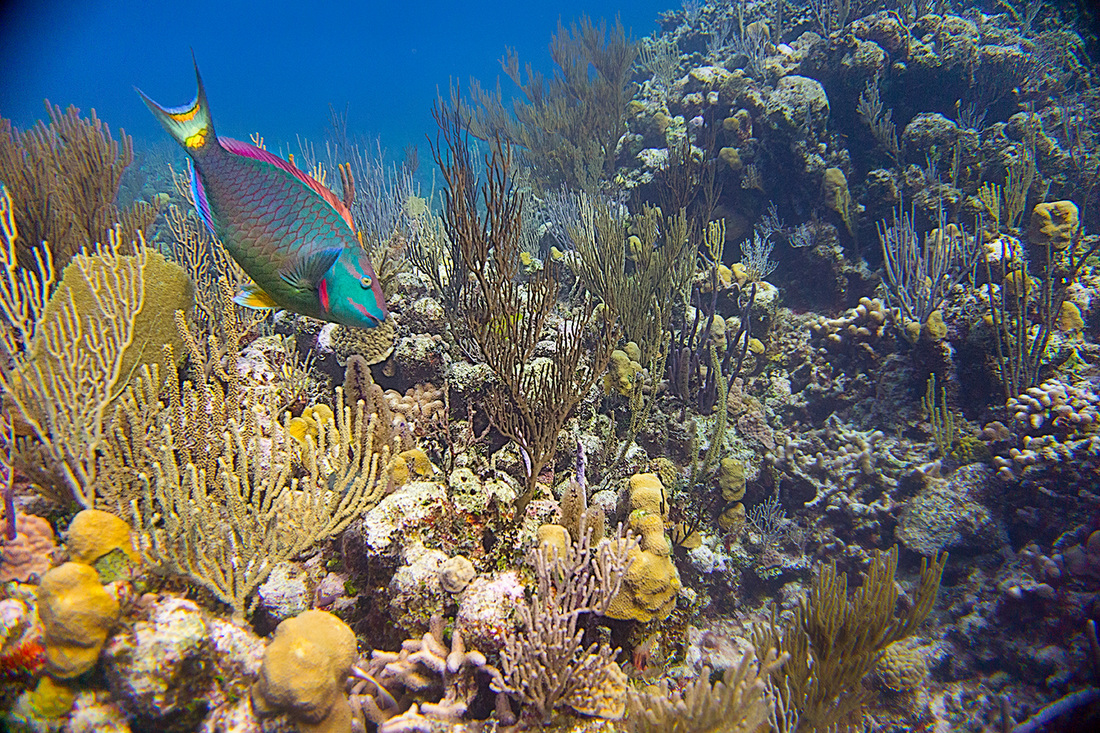 After Sharpen |
 FlickrAlbumAuthorsJill Smith 
Coral Restoration
Archives
January 2024
Categories
All
 
|

 RSS Feed
Our Services |
Company |
SupportOur Blog
|
|
Copyright © 2014
|
Newmarket, ON
|
(905) 898 5338
|
info@adventuresports.ca
|